Installing a network switch may seem difficult at first. But with the right guide, it’s manageable.
Network switches are essential for connecting devices in a network. They help in efficient data transfer and communication between devices. Understanding how to install a network switch can save time and money. You don’t need to call a professional for a simple setup.
This guide will walk you through the process step by step. It will cover the basics and provide tips to ensure a smooth installation. Whether you’re setting up a home office or a small business network, this information will be valuable. Let’s dive in and make the process simple and straightforward.
Credit: dataspan.com
Introduction To Network Switches
Network switches are essential devices in modern networking. They connect multiple devices within a network. These devices include computers, printers, and servers. Switches facilitate communication between these devices efficiently.
Understanding network switches is crucial. It helps in setting up and maintaining a network. This guide will help you understand their purpose and benefits. You will also learn about different types of network switches.
Purpose And Benefits
The main purpose of a network switch is to connect devices. Switches transfer data quickly and accurately. They improve network performance by reducing data collisions. This results in faster and more reliable network connections.
Switches also provide security benefits. They can isolate and control traffic within the network. This helps in protecting sensitive information. Switches are easy to install and manage. They offer scalability for growing networks.
Types Of Network Switches
There are several types of network switches. Each type serves different needs. The most common types are unmanaged, managed, and smart switches.
Unmanaged switches are simple and easy to use. They require no configuration. They are suitable for small networks.
Managed switches offer advanced features. They allow customization and control over network settings. They are ideal for larger and more complex networks.
Smart switches combine features of both unmanaged and managed switches. They provide some level of configuration. They are perfect for medium-sized networks.
Understanding these types helps in choosing the right switch for your network.
Gathering Necessary Equipment
Installing a network switch might seem daunting, but with the right equipment, it becomes much easier. Before you start, gather all necessary tools and materials. This will make the installation process smoother and more efficient.
Required Tools And Materials
To install a network switch, you will need a few essential tools. First, get a set of screwdrivers, both flathead and Phillips. They are needed to secure the switch and other components. Next, have a pair of wire cutters and strippers. These will help in handling cables and wires.
Also, include a cable tester. This device checks the integrity of your network cables. It ensures there are no faulty connections. Finally, have some zip ties on hand. They help in organizing and securing cables neatly.
Choosing The Right Switch
Selecting the right switch is crucial. First, consider the number of ports you need. If you have many devices, choose a switch with multiple ports. Next, think about the speed requirements. A gigabit switch is ideal for high-speed networks.
Another factor is manageability. Managed switches offer more control and configuration options. Unmanaged switches are simpler and work well for basic setups. Lastly, check the switch’s compatibility with your existing network equipment.
Planning Your Network
Before installing a network switch, plan your network layout. This step ensures efficiency and avoids future issues. Good planning saves time and resources.
Mapping Out Connections
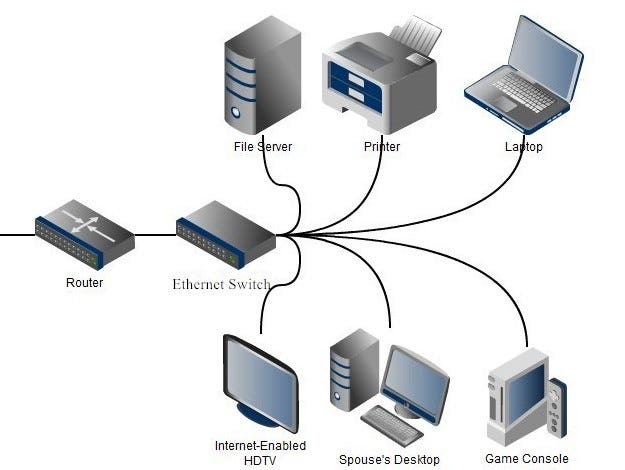
Start by mapping out your network connections. Identify all devices that need to connect to the switch. This includes computers, printers, and other networked devices. Use a simple diagram to visualize these connections.
Consider the physical layout of your space. Where will the switch be located? Think about cable lengths and routing. Ensure all devices can connect without excessive cable clutter.
Determining Port Requirements
Next, determine the number of ports required. Count all devices that need a direct connection to the switch. Include a few extra ports for future expansion. It’s better to have more ports than fewer.
Check the specifications of your devices. Some might need specific types of ports, like Gigabit Ethernet. Ensure your switch supports these requirements.
Once you have mapped connections and determined port needs, you are ready to choose the right switch. Proper planning makes installation smoother and more efficient.
Credit: medium.com
Setting Up The Physical Hardware
Setting up the physical hardware is a crucial step in installing a network switch. This process involves unboxing the device, inspecting it for any damages, and securely mounting it. Ensuring that each step is completed correctly will help avoid future issues and ensure the switch operates efficiently.
Unboxing And Inspection
Start by unboxing the network switch. Carefully remove the device and all accessories from the packaging. Check for any visible damage. Look for cracks, dents, or other signs of mishandling.
Inspect the contents of the box. Ensure you have all the necessary items. These usually include the switch itself, power cables, mounting brackets, and an instruction manual. Missing items can cause delays. Contact the supplier if anything is missing.
Mounting The Switch
Decide where to mount the switch. It should be in a cool, dry place. Avoid areas with direct sunlight or extreme temperatures. Proper airflow is vital for the switch’s longevity.
Use the provided mounting brackets to secure the switch. Follow the instructions in the manual. Ensure the switch is stable and not at risk of falling. If you are mounting it in a rack, make sure it is properly aligned.
Once mounted, connect the power cable. Plug it into a reliable power source. Turn on the switch to check if it powers up correctly. If there are any issues, refer to the troubleshooting section of the manual.
Connecting Devices
Installing a network switch might seem daunting, but with the right steps, it’s straightforward. One of the crucial steps is connecting your devices. This involves plugging in the power supply and connecting Ethernet cables. Let’s dive into these steps to ensure your network switch is set up correctly.
Connecting Power Supply
Start by connecting the power supply to your network switch. Find the power port, usually located at the back of the switch. Plug one end of the power adapter into this port.
Next, connect the other end to a power outlet. Ensure the power outlet is easily accessible and not overloaded with other devices. A surge protector can be helpful here to protect your switch from power surges.
Once connected, turn on the switch. You should see indicator lights come on, signaling that the switch is powered up and ready to go.
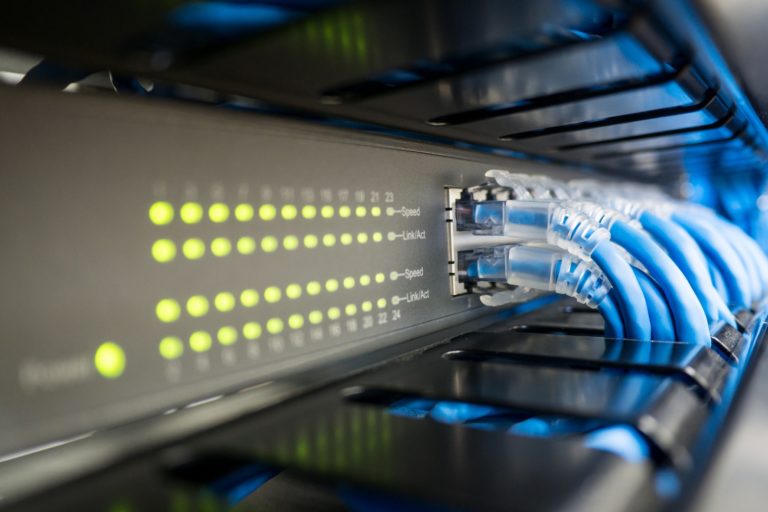
Connecting Ethernet Cables
Now, it’s time to connect your devices using Ethernet cables. Identify the Ethernet ports on the switch. These are usually labeled and numbered for easy identification.
Take an Ethernet cable and plug one end into the Ethernet port of the device you want to connect. This could be a computer, printer, or another network device.
Then, plug the other end of the cable into one of the Ethernet ports on the switch. Repeat this process for all devices you want to connect to the network switch.
Ensure the cables are securely plugged in. Loose connections can lead to connectivity issues. Check the indicator lights on the switch. They should light up, showing that the devices are successfully connected.
Connecting devices to a network switch is a simple but crucial part of setting up your network. Have you ever struggled with loose connections? Double-checking your cables can save a lot of troubleshooting time later.
Remember, a well-connected network switch ensures smooth and efficient communication between your devices. Happy networking!

Credit: www.youtube.com
Configuring The Switch
Setting up a network switch involves connecting devices, configuring settings, and ensuring proper communication. Follow the manual for step-by-step instructions. This helps in achieving a seamless network connection.
Configuring the switch is a crucial step in setting up your network switch. This process ensures your network operates efficiently and securely. Whether you’re a beginner or have some experience, understanding how to configure your switch will make a big difference in your network’s performance.Accessing The Management Interface
To start configuring your switch, you need to access the management interface. This is usually done via a web browser. Connect your computer to the switch using an Ethernet cable.Open your web browser and enter the switch’s IP address. You’ll be prompted for a username and password. Use the default credentials provided in the switch’s manual. Once logged in, you’ll see the management interface.Basic Configuration Settings
Start with basic settings. Change the default username and password to something secure. This is vital to protect your network from unauthorized access.Next, assign a static IP address to the switch. This ensures the switch can always be reached at the same address. Look for the ‘Network Settings’ or ‘IP Configuration’ tab.Enable DHCP if you want the switch to assign IP addresses to devices automatically. This can simplify network management, especially in larger setups.Set up VLANs (Virtual Local Area Networks) if needed. VLANs help segment your network for better organization and security. For instance, separate your guest network from your main network.Don’t forget to save your configuration changes. Many switches have a ‘Save’ or ‘Apply’ button at the bottom of each settings page.By following these steps, you’ll have a configured network switch ready to handle your networking needs. What’s your biggest challenge when configuring new network equipment?Testing Your Network
Once you have set up your network switch, it’s crucial to ensure everything is working correctly. Testing your network helps you identify any issues early, preventing future headaches. This step is all about ensuring each device is properly connected and communicating as it should.
Checking Connectivity
Start by connecting each device to the switch and verifying their connectivity. Use a simple ping test to check if devices can reach each other. Open the command prompt on your computer and type ping [IP address of another device]. If you get a response, that’s a good sign.
Also, check the LEDs on your network switch. These lights indicate the status of each port. A solid or blinking light usually means a good connection. If you see no light or a red light, there may be a connectivity issue.
Troubleshooting Common Issues
If some devices aren’t connecting, don’t panic. First, ensure all cables are securely plugged in. Sometimes, a loose cable is the culprit. Next, verify that the network settings on your devices are correct. Incorrect IP addresses or subnet masks can cause connection problems.
Use network diagnostic tools if you’re still having issues. Tools like Wireshark can help identify where the communication breakdown is happening. Check if the switch’s firmware is up-to-date. Manufacturers often release updates to fix bugs and improve performance. A quick update can sometimes solve persistent issues.
Have you ever faced a situation where everything looked perfect, but the network was still down? Share your experiences in the comments. Your insights could help others facing similar challenges.
Maintaining Your Network Switch
Once your network switch is installed, it’s important to keep it in good condition. Proper maintenance ensures smooth operation and prevents disruptions. Regular checks and updates are crucial to maintaining performance and security.
Regular Software Updates
Software updates are vital. They often include security patches and performance enhancements. Always check for updates from the manufacturer. Install them promptly to avoid vulnerabilities.
Set a schedule for checking updates. Monthly checks work well for most users. Make sure your switch firmware is always up-to-date.
Monitoring Network Performance
Monitor the network performance regularly. This helps in identifying potential issues early. Use network management tools for this purpose. They provide insights into traffic patterns and device status.
Keep an eye on network speed and latency. Sudden drops in performance can signal problems. Address them quickly to maintain a reliable network.
Frequently Asked Questions
How To Setup A Network Switch?
Connect the switch to power. Plug in Ethernet cables from devices to the switch ports. Configure settings via the web interface or software. Ensure proper IP addresses and subnet masks. Test connectivity.
How Do I Connect A Network Switch To My Computer?
Plug an Ethernet cable into your computer’s network port. Connect the other end to the switch’s port. Ensure the switch is powered on. Your computer should automatically detect the network connection.
How Do I Add A Switch To An Existing Network?
To add a switch to an existing network, first connect the switch to a power source. Then, use Ethernet cables to connect the switch to your router and other network devices. Ensure each connection is secure. Finally, configure the switch through its management interface if needed.
How To Install Network Step By Step?
1. Gather necessary hardware and software. 2. Connect the router to your modem. 3. Connect devices to the router. 4. Configure network settings via router’s admin panel. 5. Test the network connection.
Conclusion
Installing a network switch can seem daunting but is manageable. Follow each step carefully. Ensure all cables connect securely. Double-check settings for proper configuration. This process boosts your network’s efficiency. Remember, patience and attention to detail are key. With these guidelines, your network switch will function smoothly.
Happy networking!


