Connecting two switches together in a network is essential for expanding your network’s capacity. It allows more devices to connect and communicate efficiently.
Understanding how to connect two switches is crucial for both small and large networks. This process can enhance your network’s flexibility and performance. It is not as complex as it may seem. Whether for a home setup or a business environment, knowing the basics of connecting switches ensures seamless network operations.
This guide will walk you through the steps. You’ll learn about the cables needed, the ports to use, and the configuration required. Let’s get started on building a more robust network!

Introduction To Network Switches

Connecting two switches together in a network is a fundamental skill for anyone looking to expand their network’s capacity. Understanding the basics of network switches is crucial before diving into the actual connection process. Let’s start with an introduction to network switches to ensure you have a solid foundation.
Purpose Of Network Switches
Network switches play a key role in managing data flow within a network. They connect multiple devices, like computers and printers, and use packet switching to forward data to its destination. Think of them as smart traffic controllers for your network.
Switches can significantly improve network performance. By directing data to specific devices, they reduce unnecessary traffic. This leads to faster and more efficient communication between your devices.
Types Of Network Switches
There are several types of network switches available, each designed for different needs. Unmanaged switches are simple and plug-and-play devices. They don’t require configuration and are ideal for small networks or home use.
Managed switches, on the other hand, offer advanced features. You can configure, manage, and monitor them, making them suitable for larger networks. They provide better control over your network’s traffic and security.
Smart switches are a middle ground. They offer some management features but are easier to use than fully managed switches. They are great for small to medium-sized businesses.
Understanding the purpose and types of network switches helps you make informed decisions. Whether you’re setting up a home network or expanding a business network, choosing the right switch is essential. What type of switch do you think would best suit your needs? Let us know in the comments below!
Necessary Tools And Materials
Connecting two switches in a network can seem challenging. But with the right tools and materials, the process becomes simpler. This guide will help you gather everything you need to connect switches efficiently.
Required Hardware
First, you need the right hardware. The most important items are the switches themselves. Make sure to choose reliable and compatible switches for your network.
Next, you need Ethernet cables. These cables should be of good quality and the correct length. Ethernet cables connect the switches and ensure data transfer.
Additionally, you will need a power supply for each switch. Check that your power outlets are within reach. This prevents any power supply issues during setup.
A network rack or shelf can also be helpful. It keeps your switches organized and accessible. This is especially useful in larger networks.
Recommended Software
Software plays a crucial role in network configuration. Network management software helps monitor and manage your switches. It provides a user-friendly interface for configuration tasks.
Firmware updates for your switches are essential. These updates ensure your switches run smoothly. Always check for the latest updates before starting the connection process.
Network diagnostic tools are also useful. They help identify and resolve connection issues. Tools like ping and traceroute can be very handy.
Lastly, having a text editor can be beneficial. It helps in documenting the configuration steps. This is useful for future reference and troubleshooting.
Preparing The Switches
Connect two network switches by using an Ethernet cable. Plug one end into each switch. Ensure both switches are powered on and configured.
Connecting two switches together in a network is crucial for expanding your network and ensuring efficient communication between devices. Before you dive into the actual connection process, it’s essential to prepare the switches properly. This preparation ensures that everything goes smoothly and avoids potential issues down the line.
Checking Compatibility
First, verify that the switches are compatible with each other. Not all switches will work seamlessly together. Check the specifications and supported protocols.
For example, ensure both switches support the same VLAN configurations and trunking protocols. If you’re using switches from different manufacturers, compatibility can be a bigger concern.
Taking these steps now can save a lot of headaches later. Have you ever tried connecting incompatible devices? It can feel like trying to fit a square peg in a round hole.
Configuring Basic Settings
Next, configure the basic settings on each switch. Start with assigning IP addresses to each switch. This allows them to communicate within the network.
Ensure that each switch has a unique IP address to avoid conflicts. Also, set the subnet mask to define the network portion of the IP address.
Additionally, configure the default gateway if needed. This setting helps in directing traffic to the correct network segment. Have you ever gotten lost in a city without a map? Configuring these settings is like giving your network a clear map.
With these preparations, you’re ready to connect the switches and expand your network efficiently. What challenges have you faced while setting up network switches? Share your experiences below!
Connecting The Switches
Connecting two switches in a network is straightforward. Use an Ethernet cable to link the switches through their ports. Ensure both switches are powered on and configured correctly.
Connecting two switches together in a network can seem like a daunting task. But with the right approach, it’s simpler than you might think. Whether you’re setting up a home network or a small office, connecting switches can extend your network’s reach and improve performance. Let’s dive into the two main methods: using Ethernet cables and using fiber optic cables.
Using Ethernet Cables
Ethernet cables are the most common method for connecting network switches. They are easy to handle and widely available. To connect two switches, simply plug one end of the Ethernet cable into an available port on the first switch. Then, plug the other end into an available port on the second switch.
Ensure that both switches are powered on. The connection should be established automatically. You may notice the LED lights next to the ports blinking, indicating active communication.
If you have managed switches, you might need to configure them to recognize each other. This can typically be done through the switch’s web interface. Check your switch’s manual for specific instructions.
Using Fiber Optic Cables
Fiber optic cables offer a faster and more reliable connection than Ethernet cables. They are ideal for long-distance connections and high-speed networks. To use fiber optic cables, you will need switches with SFP (Small Form-factor Pluggable) ports.
First, insert SFP modules into the SFP ports on each switch. Then, connect the fiber optic cable to the SFP modules. Make sure the connectors are clean and properly aligned to avoid damage.
Like with Ethernet cables, ensure both switches are powered on. The connection should establish itself. If the switches are managed, you may need to configure the SFP ports through the switch’s web interface.
Using fiber optic cables can significantly enhance your network’s performance. However, they require more precision and care during installation.
—
Connecting two switches can greatly expand your network’s capabilities. Have you ever tried setting up a network with multiple switches? What challenges did you face? Share your experiences and insights in the comments below.
Configuring Network Settings
Connecting two switches in a network can be a straightforward process if you have a clear understanding of how to configure network settings. Proper configuration ensures smooth communication between devices and optimizes network performance. This section will guide you through two crucial steps: assigning IP addresses and configuring VLANs.
Assigning Ip Addresses
Assigning IP addresses to switches is like giving them unique identifiers. This helps them communicate with each other and other network devices effectively.
Start by accessing the switch’s configuration interface. This is usually done through a console cable or remotely using SSH.
Once you’re in, assign a static IP address to each switch. This prevents IP conflicts and ensures consistent connectivity. For instance, you might set one switch to 192.168.1.1 and the other to 192.168.1.2.
Have you ever assigned IP addresses to your devices before? If not, it’s time to learn how. This step is crucial for managing your network efficiently.
Configuring Vlans
VLANs (Virtual Local Area Networks) help segment your network logically, improving security and performance. They allow different devices to communicate as if they were on the same physical network, even if they are not.
To configure VLANs, access the switch’s configuration interface. Create a new VLAN and assign it an identifier number, such as VLAN 10 or VLAN 20.
Then, assign specific ports on the switch to the VLAN. This ensures that devices connected to these ports are part of the same VLAN.
Have you considered how VLANs can enhance your network’s efficiency? They can significantly reduce broadcast traffic and improve overall network performance.
By following these steps, you will have a well-configured network with switches that communicate seamlessly. Take the time to understand each concept, and you’ll find managing your network becomes much easier.
Testing The Connection
Connecting two switches in a network involves using an Ethernet cable to link their ports. This setup ensures smooth data flow between devices. Follow basic configurations for optimal performance.
Testing the connection between two switches is a crucial step to ensure your network is functioning correctly. After setting up the hardware and configuring the switches, verifying the link helps confirm that everything is properly connected and working. This process involves a few simple checks but can save you from potential network issues down the line.
Verifying Connectivity
First, you need to check the physical link between the switches. Look at the LEDs on the switch ports; they should be lit and steady. If they’re blinking or off, it indicates a problem.
Use the ping command to check connectivity. Open a terminal or command prompt on a connected device and ping the IP address of a device on the other switch. A successful ping means the connection is good.
Another method is to check the switch interface status. Log in to the switch’s console and use the show interface command. It will display the status of each port, confirming if the link is active.
Troubleshooting Common Issues
If the physical link LEDs are not lit, ensure the cables are properly connected and compatible. Sometimes, a simple re-plugging can solve the issue.
Check the switch configuration. Ensure that the ports are correctly configured and not shut down. Use commands like show running-config to review settings.
Inconsistent network performance can be due to misconfigured VLANs. Verify that VLAN settings match on both switches. Use the show vlan command to review the VLAN configuration.
Address IP conflicts. Ensure that devices on your network have unique IP addresses. Duplicate IPs can cause connectivity problems.
If you’ve tried these steps and still face issues, consult the switch’s manual or seek support from the manufacturer. Sometimes, firmware updates can resolve underlying problems.
By following these steps, you can effectively test and troubleshoot the connection between your switches. What techniques have you found effective in ensuring your network remains stable? Share your experiences and tips in the comments below.
Advanced Configuration
Connecting two switches in a network allows devices to communicate seamlessly. Use Ethernet cables to link the switches. Configure settings to ensure smooth data transfer.
Advanced Configuration
Advanced configuration can take your network setup to the next level, offering enhanced performance and reliability. When connecting two switches together, advanced settings like Link Aggregation and the Spanning Tree Protocol (STP) can optimize your network. These configurations are not just for large enterprises; even small businesses can benefit from these features.
### Link Aggregation
Link Aggregation is a method to combine multiple network connections into a single logical link. This increases bandwidth and provides redundancy in case one connection fails.
To set up Link Aggregation, you’ll need to access your switch’s management interface. Look for settings related to Link Aggregation or LAG (Link Aggregation Group).
1. Select Ports: Choose the ports you want to aggregate. Usually, you would pick ports that connect to the same switch.
2. Configure LAG: Assign these ports to a Link Aggregation Group. This configuration might differ slightly based on your switch model.
3. Test the Setup: After applying changes, test the aggregated link to ensure it’s working correctly.
Link Aggregation can significantly improve your network’s performance. Imagine downloading large files or streaming videos with no lag. That’s the kind of efficiency you can achieve.
### Spanning Tree Protocol
The Spanning Tree Protocol (STP) is crucial for preventing network loops. Network loops can cause broadcast storms, leading to network failure.
STP automatically disables redundant paths to prevent loops. Here’s how you can configure STP on your switches:
1. Enable STP: Access the switch’s management interface and navigate to the STP settings.
2. Select Priority: Set the bridge priority. The switch with the lowest priority becomes the root bridge.
3. Verify Configuration: Check that STP is active and verify the root bridge. This ensures your network is loop-free.
If you’ve ever faced network outages, you know how frustrating they can be. STP can help you avoid such issues, ensuring your network remains stable.
By focusing on these advanced configurations, you can create a robust and efficient network. Have you ever tried configuring Link Aggregation or STP? What challenges did you face? Share your experiences and insights in the comments below.
Credit: www.youtube.com
Best Practices
Connecting two switches together in a network can seem straightforward, but there are key best practices to ensure optimal performance and security. By following these guidelines, you can create a robust and efficient network. Let’s dive into some essential practices.
Maintaining Network Security
Network security is crucial when connecting switches. Use strong passwords and enable encryption to protect your network from unauthorized access.
Implement VLANs (Virtual LANs) to segment your network. This limits the spread of potential security breaches.
Don’t forget to regularly update firmware on your switches. This helps in protecting against vulnerabilities.
Monitoring Network Performance
Monitoring network performance ensures your setup runs smoothly. Use network monitoring tools to keep an eye on traffic and identify bottlenecks.
Set up alerts for unusual activities. These can help you detect issues early and prevent network downtime.
Regularly review logs to understand network behavior. This can provide insights into necessary adjustments.
Have you considered how well your network performs under heavy load? Testing during peak times can reveal weak points that need addressing.
By focusing on these best practices, you ensure that your network remains secure and performs efficiently. What’s your experience with connecting switches? Share your thoughts and tips in the comments below.
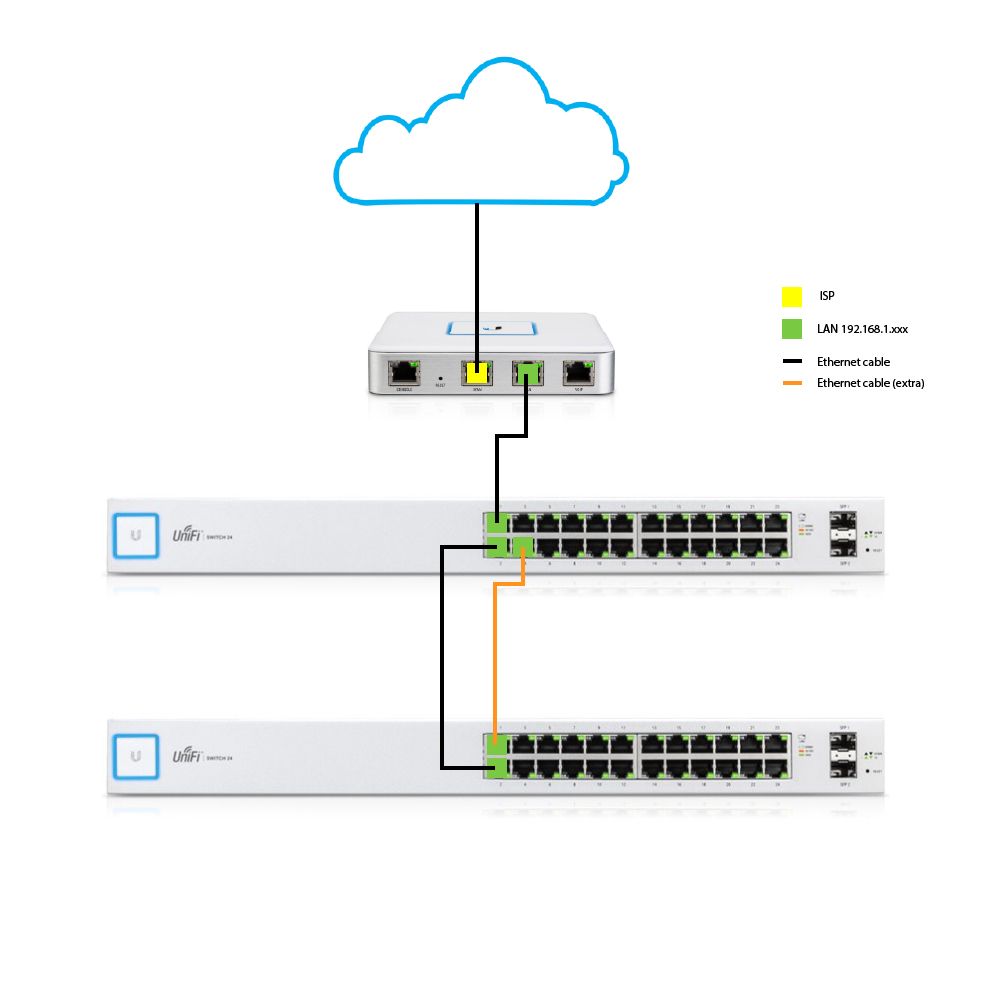
Credit: community.ui.com
Frequently Asked Questions
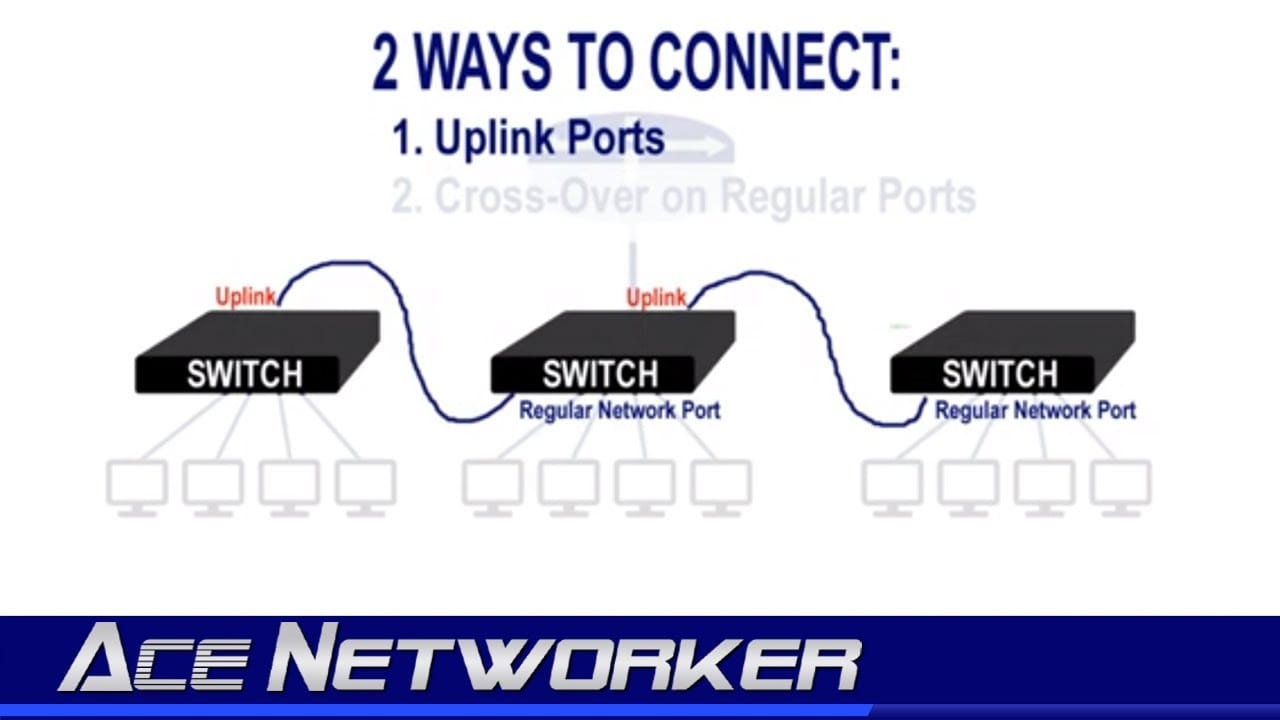
Can You Connect Two Network Switches Together?
Yes, you can connect two network switches together. Use an Ethernet cable to link them via their uplink ports.
What Cable Connects Two Switches Together?
A straight-through Ethernet cable connects two switches together. It ensures proper communication and data transfer between devices. Use a Cat5e or Cat6 cable for optimal performance.
Can I Connect A Switch To A Switch?
Yes, you can connect a switch to a switch. Use an Ethernet cable to link them. This expands your network and adds more devices. Ensure both switches are powered on.
What Is A Result Of Connecting Two Or More Switches Together?
Connecting two or more switches expands the network size. It allows more devices to communicate and share resources. This setup enhances network flexibility and scalability.
Conclusion
Connecting two switches in a network is straightforward. Follow the steps carefully. Ensure all cables are secure. Double-check switch settings. Test the connection for reliability. Troubleshoot if issues arise. Success means better network performance. Sharing this guide helps others too.
Happy networking!


