Changing your wireless network name on a Netgear router is simple. It enhances security and personalizes your network.
Netgear routers are popular for their reliability and performance. But many users don’t know how to change the wireless network name, or SSID. Updating your SSID can help distinguish your network from others nearby. This guide will walk you through the steps to easily change your Netgear wireless network name.
Whether you’re tech-savvy or a beginner, you’ll find this task manageable. Ready to give your network a fresh identity? Let’s get started.
Preparation
Changing your wireless network name on a Netgear router is simple. Proper preparation is key. Follow these steps to make the process smooth and hassle-free.
Gather Necessary Information
Before starting, collect all required information. Knowing your current network name and password is essential. This information helps you access your router settings.
| Information Needed | Description |
|---|---|
| Current Network Name (SSID) | Your router’s existing wireless network name |
| Current Password | Password for your wireless network |
| Router Login Details | Username and password for the router’s admin panel |
Ensure you have the router’s IP address. Usually, this is 192.168.1.1 or 192.168.0.1. Check your router’s manual for the exact IP address.
Ensure Device Connection
Connect your computer or mobile device to the router. Use a wired connection for stability. If you use Wi-Fi, ensure a strong signal.
- Plug an Ethernet cable into your computer and router.
- If using Wi-Fi, stay close to the router.
Open a web browser on your connected device. Type the router’s IP address into the address bar. Press Enter to access the login page.
Enter your admin username and password on the login page. These details are usually on a sticker on your router. If you changed them, use the new credentials.
Credit: www.youtube.com
Access Router Settings
Changing your Netgear wireless network name is simple. Start by accessing the router settings. You need to follow a few easy steps to get there. This guide will help you through the process.
Open Web Browser
First, open your web browser. You can use any browser like Chrome, Firefox, or Safari. Make sure your device is connected to the Netgear router. This is crucial for accessing the settings.
Enter Router Ip Address
Next, type the router’s IP address into the browser’s address bar. Most Netgear routers use 192.168.1.1 or 192.168.0.1. Press Enter. You will see the login page for your router.
Here’s a quick table for common IP addresses:
| Router Model | IP Address |
|---|---|
| Netgear Nighthawk | 192.168.1.1 |
| Netgear Orbi | 192.168.0.1 |
Enter the username and password. The default username is usually admin. The default password is password. If you changed these, use your custom login details.
- If you forget your login details, you may need to reset your router.
Once logged in, you can access all the router settings. You are now ready to change your wireless network name.
Login To Router
Changing the wireless network name on your Netgear router is simple. First, you need to log in to your router. This process allows you to access the settings and make necessary changes. Let’s go through the steps.
Enter Username And Password
Open your web browser. Type the router’s IP address into the address bar. Usually, the IP address is 192.168.1.1 or 192.168.0.1. Press Enter. You will see a login screen. Here, you need to enter your username and password.
Common Default Credentials
If this is your first time logging in, use the default credentials. The default username is often “admin”. The default password is usually “password” or “1234”. If these do not work, check the router’s manual. Sometimes, the default credentials are printed on a sticker on the router itself.
Credit: kb.netgear.com
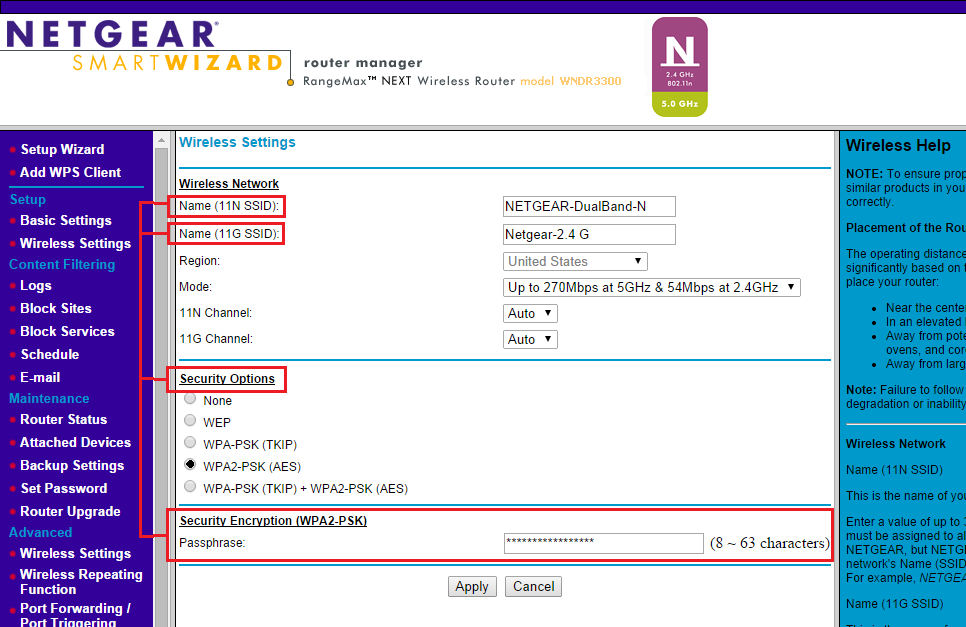
Navigate To Wireless Settings
Changing the name of your Netgear wireless network is simple. The first step is to navigate to the wireless settings. This allows you to access the necessary options. Follow these instructions to make the changes quickly.
Find Wireless Section
First, you need to find the wireless section. Open your web browser. Type 192.168.1.1 or routerlogin.net in the address bar. Press Enter. You will see the Netgear login page.
Enter the username and password. The default username is admin and the default password is password. If you changed these, use your own login details.
After logging in, you will see the Netgear dashboard. Look for the Wireless option in the menu. Click on it to open the wireless settings.
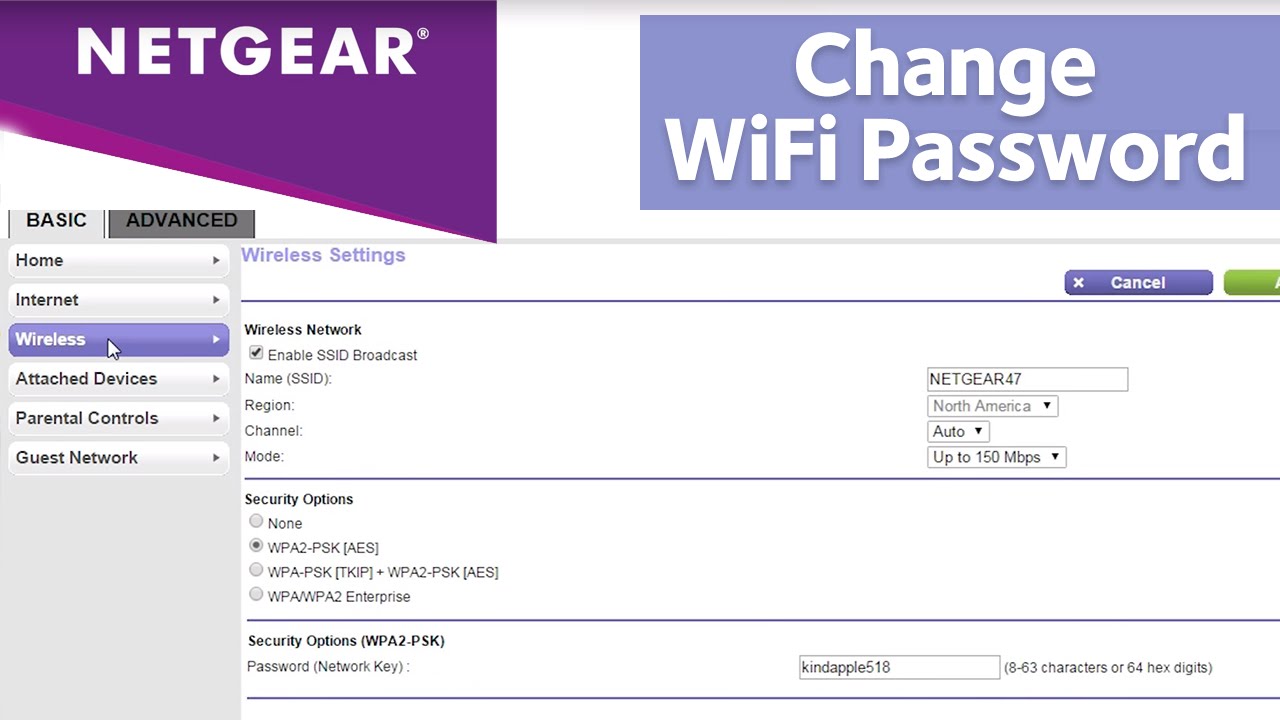
Select Basic Settings
Now that you are in the wireless section, find the Basic Settings tab. Click on it. Here, you will see the current wireless network name (SSID).
To change the network name, simply delete the old name. Enter the new name you prefer. Make sure the new name is unique and easy to remember.
Once you have entered the new name, scroll down. Click on the Apply button. This will save your new settings.
Your wireless network name is now updated. Devices connected to your network might need to reconnect with the new name.
| Step | Action |
|---|---|
| 1 | Open Web Browser |
| 2 | Type 192.168.1.1 or routerlogin.net |
| 3 | Log in with username and password |
| 4 | Click on Wireless |
| 5 | Select Basic Settings |
| 6 | Enter new network name |
| 7 | Click Apply |
Change Network Name
Changing the network name of your Netgear router can help you easily identify your Wi-Fi network. This guide will show you how to change the network name step-by-step. Follow these instructions to ensure your new network name is set up correctly.
Locate Network Name Field
First, log in to your Netgear router’s web interface. You can do this by typing “http://www.routerlogin.net” into your web browser’s address bar. Enter your router’s username and password when prompted. Once logged in, navigate to the “Wireless” or “Wi-Fi” settings. Here, you will find the field labeled “Network Name (SSID)”.
Enter New Network Name
In the “Network Name (SSID)” field, delete the existing name. Type your new desired network name. Make sure your new network name is easy to remember and unique. Avoid using personal information in your network name for security reasons. Once you have entered your new network name, click the “Apply” or “Save” button to save the changes. Your router will now broadcast the new network name.
Here is a simple table to summarize the steps:
| Step | Action |
|---|---|
| 1 | Log in to router’s web interface |
| 2 | Navigate to “Wireless” or “Wi-Fi” settings |
| 3 | Locate “Network Name (SSID)” field |
| 4 | Enter new network name |
| 5 | Click “Apply” or “Save” |
After changing the network name, you may need to reconnect your devices using the new name. This simple change can help keep your network organized and secure.

Credit: www.youtube.com
Save Changes
After entering a new name for your Netgear wireless network, the next step is crucial. You need to save the changes to ensure your new network name is applied. Follow these steps carefully to complete the process smoothly.
Apply Settings
Once you have typed the new name, look for the “Apply” button. This button is usually at the bottom or top of the settings page. Click on it to save your changes. This action tells your Netgear router to update the network name.
Wait For Confirmation
After clicking “Apply,” wait for a confirmation message. This message will inform you that the changes have been saved. Your router may take a few seconds to process this request. Do not close the browser or turn off the router during this time.
Once confirmed, your new network name will be active. You may need to reconnect your devices to the updated network.
Reconnect Devices
After changing your wireless network name on your Netgear router, it’s crucial to reconnect all your devices. This ensures they can access the internet with the new network settings.
Update Network Name On Devices
To reconnect your devices, update the network name on each one. Follow these steps:
- Go to the Wi-Fi settings on your device.
- Search for the new network name.
- Select the new network name.
- Enter the updated password if required.
Repeat these steps for all devices, including smartphones, laptops, and smart home devices.
Verify Connectivity
After updating the network name on all devices, verify they are connected properly. Check the following:
- Device shows the new network name.
- Internet connection is active.
- No error messages appear.
For a quick check, try browsing the internet or using an online app. If everything works, your devices are successfully reconnected.
Troubleshooting
Encountering issues while changing your wireless network name on your Netgear router? This troubleshooting guide will help you identify and resolve common problems. Let’s dive into the details.
Common Issues
Sometimes, changing the network name can be tricky. Here are some common issues you might face:
- Network Name Not Updating: Your new network name doesn’t appear.
- Router Not Responding: The router becomes unresponsive.
- Connection Drops: Wireless connection keeps dropping.
Addressing these issues can save you time and frustration.
Resetting Router
If problems persist, consider resetting your router. Follow these steps:
- Locate the reset button on your router. It’s usually at the back.
- Press and hold the reset button for 10 seconds.
- Wait for the router to reboot. This might take a few minutes.
- Reconfigure your network settings, including the network name.
Resetting the router can resolve many issues and give you a fresh start.
For more detailed steps, refer to your Netgear router’s manual. Each model can have specific instructions.
Frequently Asked Questions
How To Access Netgear Router Settings?
To access Netgear router settings, open a browser and enter “http://www. routerlogin. net”. Log in with your admin credentials.
What Is The Default Username And Password?
The default username is “admin” and the default password is “password”. Change these for better security.
How To Change The Wireless Network Name?
Log in to your Netgear router. Navigate to “Wireless Settings”. Enter a new name in the “SSID” field and save.
Why Change The Wireless Network Name?
Changing the wireless network name improves security and makes it easier to identify your network among others.
Conclusion
Changing your Netgear wireless network name is simple. Follow the steps mentioned. First, access the router settings. Then, navigate to the wireless settings section. Enter the new name and save changes. Restart your router to apply the changes. Your new network name should now appear.
This improves network security and makes it easier to identify. Keep your new name unique but easy to remember. Happy surfing!